Party Formation
In this game, a party consists of up to 4 members. All quests and missions are tackled by a single party, so if you’re just aiming to complete the game, you don’t need to train multiple parties simultaneously.
However, by sending parties other than your main one on party dispatch, you can obtain not only regular items but also rare currency like Dragonite and item materials. So, once you have enough items, try creating multiple parties.
Regarding party composition, there are no restrictions other than the number of members, but there are tips to stabilize combat.
About Aggro Rate

Particularly, “aggro” is an important parameter.
In this game, giving significant damage to enemies or greatly healing allies increases your attention. Attention is indicated by a vertical blue bar to the right of the icon. Enemies will actively attack members with high attention. Additionally, for area attacks like breath or whole magic attacks, the damage increases or decreases according to the attention ratio.
Therefore, by having a member with high defense accumulate a lot of attention, they can take the brunt of the enemy’s attacks, protecting other members with lower defense. Such members are called tanks.
Considering attention, here are three points to keep in mind:
1. Assign a Tank for Your Party
By growing the jobs of Blacksmith or Mercenary, you can obtain skills like “Taunt” to draw enemy attention or “Party Guard” to protect the whole party. Train one such adventurer as your party’s tank.
During combat, increasing attention means that enemy attacks will focus on this adventurer, so equip them with heavy armor that provides Defense UP or Max HP UP. Especially, the “Party Guard” skill learned by the Blacksmith is essential for tanks, as it allows them to take damage on behalf of allies regardless of attention. If you’re using a Mercenary as a tank, ensure to grow a Blacksmith sufficiently to acquire “Party Guard.”
2. Include Multiple Adventurers with Healing Skills
Healers are as important as tanks. Train Clerics as your healers.
As in the previous game, magic-based jobs like Alchemist or Astrologer can also use low-level Cleric skills. So, teach these jobs skills like “Heal” or “Cure” to help in critical moments.
3. Equip Support and Healing Skills to Other Attackers
Finally, decide on attackers based on your preferred or powerful weapons you find. This should be enough to progress without problems until the mid-game. If you hit a wall, train jobs other than your main one to acquire skills.
As your level increases (the greater the level difference), the experience points gained from low-level jobs also increase. Regularly acquiring useful skills from jobs other than your main job is essential for strengthening your party. (For more details, refer to About Adventurers.)
For example, if a Alchemist learns the “Dual Wielding” skill from a Hunter, their magic power becomes more potent. If a Cleric learns “Reduced Aggro,” they can lower their attention even when dealing high damage.
Party Enhancement
This section explains how to enhance your party, focusing particularly on new systems introduced in this game.
1. Leveling Up Adventurers
Leveling up adventurers is a basic aspect of role-playing games, not just this one.
By leveling up adventurers, you can boost HP, MP (and SP, VP), acquire new skills, and in this game, you can improve skill levels for most skills except for a few.
Passive skills, in particular, show significant performance improvement from level 1 to level 3. Important skills like “Shield Defense Boost,” “Dual Wielding,” and “Super Recovery” should be actively leveled up according to the job. For details, refer to About Adventurers.
2. Party Effects
Some adventurers have party effect skills that provide benefits to all other party members when they join the party.
For example, the first created adventurer always has “ALL UP+2,” which boosts all stats of other adventurers by +2 when they join the party. Finding and including such adventurers in your party will enhance the party’s overall strength.
Party effects can also be randomly assigned to adventurers by spending Dragonite at the Mage Association as you raise the Market level. This allows you to assign party effects to adventurers who did not initially have them, so it is fine to train high-stat adventurers without party effects initially.
3. Raising Market Level
In this game, by investing in the Market and raising its level, you can improve the item ranks available in the Market and unlock features at the Forge and Mage Association.
Equipping stronger weapons is a basic hack-and-slash enhancement method, but relying solely on item drops from battles can be insufficient. By raising the Market level, unlocking the Curiosity Shop and Forge, and obtaining items listed there, you can strengthen your party more strategically rather than leaving it to chance.
Generally, the item rank order is as follows, and creating high-rank items at the Forge and enhancing them with Arcanestones, or improving low-rank but effective items, will greatly benefit your adventure.
Boss Enemy Drops > Forge (Creation) > Rare Shop >= Normal Enemy Drops >= Regular Shop
4. Read Battle Logs
In the Guild menu, you can find the log of the previous battle, literally showing the details of the last battle. Use this to investigate why your party fell apart.
There are not many patterns that lead to a total defeat, typically either the tank role falls first or the healer/damage dealer does.
If the tank falls first, the response is simple: strengthen the tank’s defense and MHP. It is also effective to level up skills like “Shield Defense Boost” or “Defensive Stance.”
If the healer or damage dealer falls first, it means the tank is not functioning properly.
There could be various factors in this case, but here are some useful strategies to consider.
The Tank Cannot Fix the Target
Strengthening the tank’s attack power is basic, but sometimes you might lack the capacity to focus on defense effects due to magical effects.
For example, if you have the blacksmith as your tank, it might be beneficial to acquire high-power skills like the mercenary’s “Sweeping Slash” or the hunter’s “Poison Rain Arrow.”
In this game, jobs and weapon types are not dependent, and any job can use any weapon. However, skills might not be usable due to the level required to learn the skill and the growth limit. In such cases, you can use Physical Limit UP or All Limit UP to make them usable. For more details, refer to the “Restrictions on Active Skills” in About Adventurers.
If you have skill points to spare, raising the level of the main skill you use is also effective.
Next, have the tank acquire the “Increased Aggro (Mercenary 60)” skill, or have the attacker acquire the “Reduced Aggro (Cleric 20)” skill.
This can have a significant effect when the skill level is raised.
The Tank Maintains the Target, But the Healer or Attacker Suddenly Dies
In this game, even if the attention is ranked first, it does not always mean the target will always be maintained.
A higher attention means a higher chance of being targeted, but other members can still be targeted.
One effective countermeasure is the blacksmith’s “Party Guard” skill.
“Party Guard” is a skill that shoulders a certain percentage of the damage that other members would take, regardless of attention.
Even if your tank is a job other than blacksmith, make sure to acquire at least the low-level “Party Guard.” Raising the skill level will increase the percentage of damage shouldered.
If other members still fall first even with “Party Guard” active, improve their defense and MHP.
While refreshing the armor is the classic method, you can also equip shields with Defense UP or MHP UP effects for tough boss battles, especially if you usually fight with “Dual Wielding” or “Two-Handed” weapons.
The skill “Shield Defense Boost,” which can be acquired at Blacksmith 20, if raised to level 3, allows the Auto AI set to “Defensive” or “Supportive” to automatically defend constantly. Assigning this to the healer can increase stability at the cost of higher stamina consumption.
For more details on shield mechanics, refer to the section in About Adventurers.
Additionally, Auto AI is explained in About Adventurers, so please refer to it.
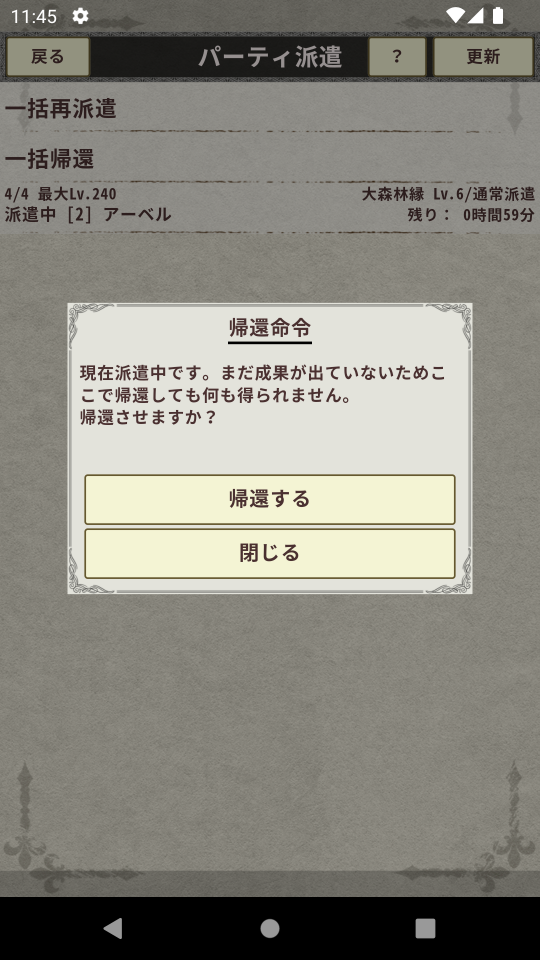
Party Dispatch
Party Dispatch is a background exploration feature where you send a party and receive experience points, items, Dragonite, etc., after a certain amount of real-world time.
The dispatch locations are determined by the levels (difficulty) of cleared locations, and there are four types of dispatch missions. Each type yields different results and has set durations and the number of parties that can participate.
Dispatch Types
Normal Dispatch: Primarily yields regular items.
Resource Exploration: Primarily yields materials.
Combat Support: Primarily yields experience points.
Special Mission: Yields Dragonite.
Dispatch Results
The results of a party dispatch depend on the number of party members and the quality of their equipment. If the equipment quality exceeds 100 relative to the dispatch location level, good results are achieved. If it falls below 100, the number of items and Dragonite obtained will decrease.
Early Return
Adventurers dispatched on a mission cannot participate in battles, change equipment or jobs, or be dismissed until they return from the mission.
In such cases, you can bring them back early from the “Party Dispatch” screen in the Guild menu, allowing you to perform the above actions.
However, if they return early, you will not receive any rewards regardless of the elapsed time, so please be cautious.